Who bids me hope, and in that charming word
Has peace and transport to my soul restor’d.
-
George Lyttleton.
Well a
jolly good morning to you all! My beaded
dolls have caused quite the stampede of emails and requests for a tutorial on
how to make them, so I will share with you and have made an attempt at a
tutorial at the end of this post. I have joined the girls with 1 Xmas Item a
Month over at Narelle’s blog. For this month’s item I have made....you’ll never
guess....

A beaded Christmas doll!!!
I also
started making something last post and asked you gals to have a guess at what
it might be...one of you came very close. Those 4 little red things were
actually Santa bodies in the making. Here they are (one finished and others
still in the making).

A very
rare photo of Heather actually sitting still and not terrorizing everybody!!!
Lol (I had her strapped to her seat...which is the naughty corner seat I might
add). Cute as a button she is really.

Can you see the scary monster sitting at the table???
Heather gave me these beautiful beads to keep making beaded dolls, they are rather gorgeous.

I’m sure
none of you will scoff and laugh out loud, but this is a photo of
treasure.....someone gave me two big boxes full of material. I had to wash it
all because it had been sitting for a very long time, but the material inside
was just fab!!!! There are so many different textured materials that I’m going
to have fun making all sorts of things.

I’m buzzing off now to annoy or tease my hubby, have I mentioned he has no hair left? Wonder why? Lol. Have a fab week ahead and love life!!
Cheers, Anita.
Beautiful Italy - Gardens of Axel Munthe, San Michele Villa

Tutorial
– Beaded doll
Calico,
fabric for dress and pants, beads (any size), pearl cotton, buttons, toy
stuffing, any embellishment you would like to add.
These
can be made in any size that suits you. If you want to make a brooch, as I do,
then check out my template for size. Just copy the shape as you can see it in
the pic.
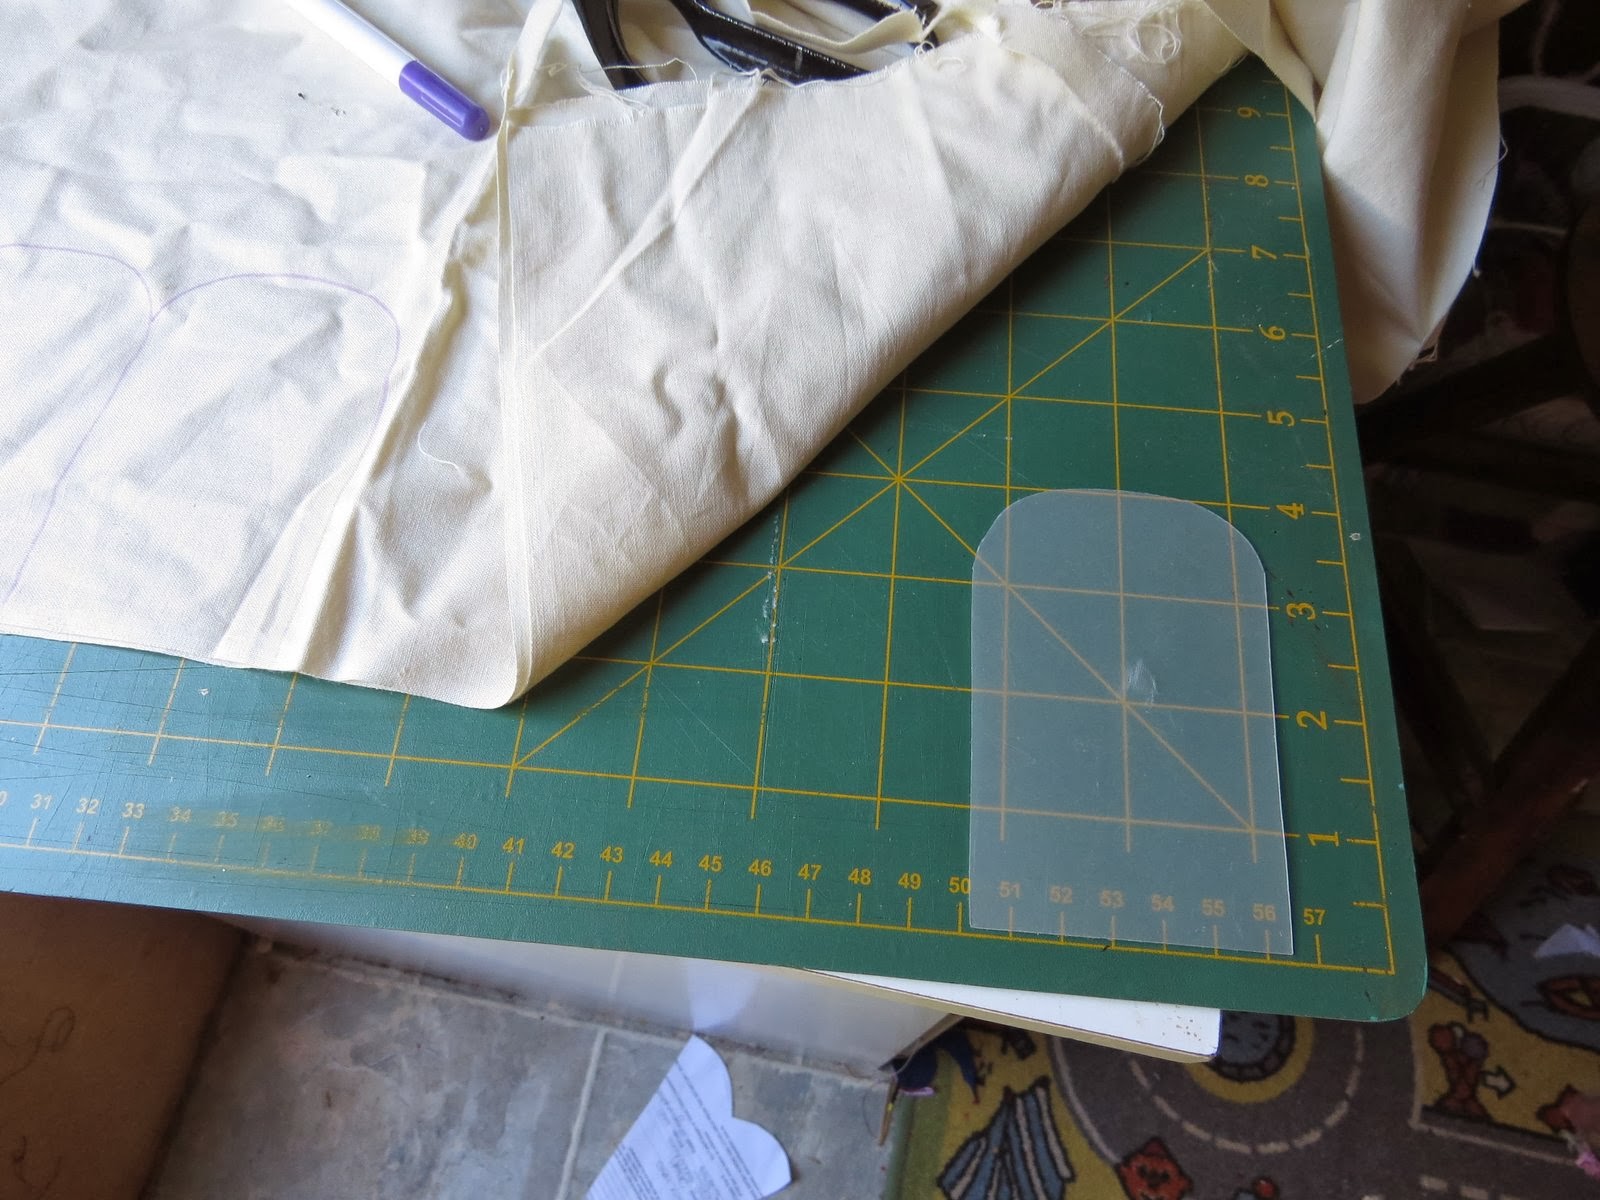
Trace
onto folded calico, so you cut 2 shapes at a time. Cut out shapes and pin together.


Give the rounded edges a snip.

Turn
material inside out and stuff with toy stuffing.
Make a
small hem and top stitch the opening.
Making pants is optional. I cut a 1 and a half inch by 4 inch piece of organza, stitched the 1 and a half inch seam together, turn inside out. Place on doll, make a small hem and do running stitch across the top of the pants and also by sure to stitch it to the body of the stuffed doll as you go.
Make a
knot to finish off. Cut of end. For the crutch part of pants, I just stitch up
the middle part with a couple of small over sews and tie off.

Dress: 2 and a half x 4 inch piece of material. Sew up the 2 and a half inch side and turn inside out. This next part of sewing I use quilters cotton doubled on a needle and a good long thread. Make a small hem of about quarter inch and do a running stitch to gather it. Put it on the doll and pull gently so the dress fits nicely. Make a knot to tie it on but don’t cut the thread. After you have the dress in place put the needle through the back of the doll and push it through to the front. You can then sew a button on the front of the dress using this thread. Once you have sewn the button on, take the needle back through to the back of the doll, knot and tie off.

Arms and
legs.
Using
pearl cotton and a long thread, I run the needle into the back of the doll and
push the needle through were the first arm would go. I make sure to pull the
knot right through the body so you can’t see it. Place 4 beads on thread and
then turn the needle back through 3 of the beads and go back into the place
your thread came through the material and take the needle straight through to
the other arm. This next bit is tricky because you have to pull the beads
together just enough so it doesn’t make the arms stick out straight, just a little
loose. Repeat for other arm and when you have pulled the beads together you
can do a knot a tie off. The same is
done for the legs and I use 5 beads for the legs.


Hair: For the hair I just use my imagination. For
this doll I used 4 stars and tiny beads of the same colour for the hair. I have
used embroidery thread for hair (see last post for ideas). For the face I use
pens and just draw the faces on. And you can use a blush for cheeks.
If you had any trouble following my instructions
do contact me as I’ve made a million of these dolls, have never done a tutorial
before and would really love you to be able to make these dolls. Really, after you have the body, arms and legs
on you can do your own thing. Enjoy.


12 comments:
Cute doll and thanks for tut.. Hello Heather....
Hi, Heather - waving at you from snow-covered Ontario, Canada, where the winter weather arrived today with a BANG, a blizzard and a white-out!
Anita thank you so much for doing the tutorial - I really love those little beaded dolls of yours, and would like to make a few :) They could be done with seasonal fabrics to make decorations, and they could also be made with the scraps from kids clothes to make a matching dolly for the little ones :)
Thanks for the tutorial, we shall be seeing beaded dolls appearing across the world now :)
those beaded dolls are so cute and I do love your Santa ones....
Great to get a lovely big box of treasures... I can just imagine the fun you will have with them...
Hugz
Cute little doll I do not think I would have the patience
Great treasure you have washed there
Enjoy your fabric!!! great tutorial - the beaded dolls are cute and very handy as little gifts!!
Your little doll just jumped right out at me so I had to see what you were up to. Thanks for the tutorial. I might just have to make a couple for the tree this year. I love your beads. Perfect for Christmassy things and there is nothing like a fabric treasure to make life wonderful. A jolly day to you too.
The doll is so cute. Thanks for the tutorial. Hugs,xx
Well done with your tutorial, Anita, and lovely to see the Santa variation as well.
Good to see Heather behaving herself!!
That looks like a very exciting bundle of fabric on your line. I can see many happy hours of sewing in your future.
How many weeks of work are left? When does school break up for the year?
Your beaded dolls are just gorgeous Anita - thanks so much for a great tutorial. I love your freshly laundered fabric treasures all hanging on the line - you have some really interesting fabrics in there by the looks. Also your stash of beads are just beautiful. Happy creating :-)
How cute is that doll! Adorable!
Your Angel Doll is very sweet, thank you for sharing her.
I would never guessed 4 Santas, very clever little fellows :)
Thank you for being a 1 Xmas Item Elf this year.
Post a Comment